vagrant를 사용한 kali linux 설치
kali Vagrantfile 생성
$ vagrant init offensive-security/kali-linuxor
# -*- mode: ruby -*-
# vi: set ft=ruby :

Vagrant.configure("2") do |config|
  config.vm.box = "offensive-security/kali-linux"

  # Create a forwarded port
  config.vm.network "forwarded_port", guest: 80, host: 8080

  # Create a private network. In VirtualBox, this is a Host-Only network
  config.vm.network "private_network", ip: "192.168.33.10"

  # VirtualBox specific settings
  config.vm.provider "virtualbox" do |vb|
    # Hide the VirtualBox GUI when booting the machine
    vb.gui = true

    # Customize the amount of memory on the VM:
    vb.memory = "4096"
  end

  # Provision the machine with a shell script
  config.vm.provision "shell", inline: <<-SHELL
    apt-get update
    # apt-get -y upgrade
  SHELL
end
vagrantfile 생성 후 아래 명령으로 실행
$ vagrant up한글 입력기 셋팅
kali linux vagrant의 경우 영어가 기본 언어로 설정되어 한글을 사용할 수 없다.
한글 사용을 위해 다음 셋팅이 필요하다.
한글 폰트 및 입력기 설치
 $ apt-get install -y fcitx-lib*
 $ apt-get install -y fcitx-hangul
 $ apt-get install -y fonts-nanum*
입력기 설정
$ im-config- OK, YES 순서대로 누름
- 라디오 박스 선택에서 fcitx 선택 후 OK, OK
재부팅하여 설정 적용
입력기를 fcitx로 선택하였으므로 fcitx설정을 해준다.
아래 명령을 통해 fcitx 설정을 연다.
fcitx 설정
$ fcitx-configtool
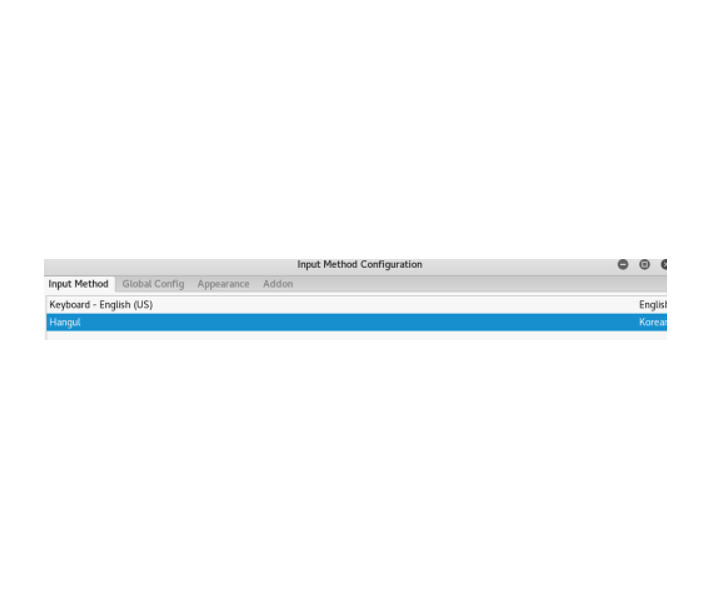
설정을 열 경우 아래와 같이 영어만 존재한다.

- 버튼을 클릭하여 hangul을 검색하여 추가
한영 전환은 ctrl + space로 하면된다.
한영키를 사용하기 위해선 fcitx-configtool에서 전환키 설정으로 바꿔주면 된다.
참고
'IT' 카테고리의 다른 글
| window package manager (1) | 2021.09.12 |
|---|---|
| wsl2(preview version) network unreachable error (0) | 2019.08.15 |
| [vim] 더하기 빼기 (0) | 2018.11.30 |
| [IT 용어] ECU(Electronic control unit) (0) | 2015.09.15 |